


In the life department, we've been busy with household renovations, namely updating the basement. The goal is to turn what has been a mish-mash of storage and guest room into a comfortable, appealing living space.
I started with painting our white fireplace.

I prefer a more natural look. So, I purchased some Brick-Anew paint, in taupe.
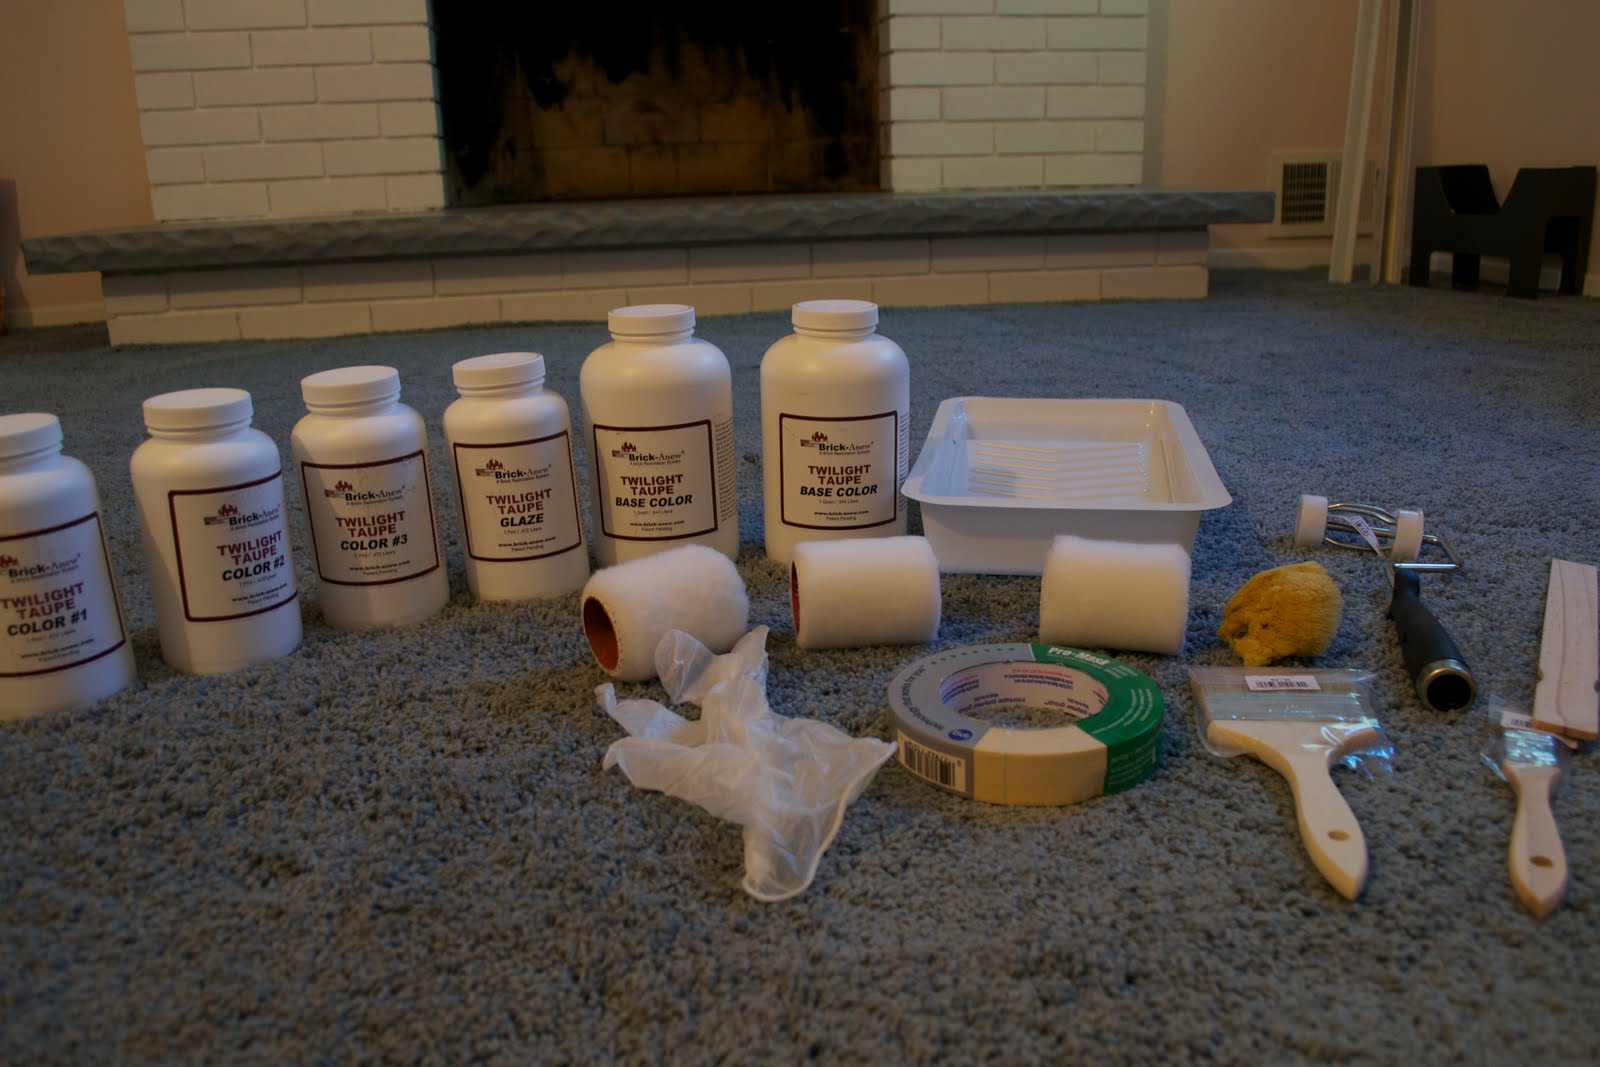
Here's a step-by-step pictorial of the progression after each coat:
Step 1:

Step 2:

Step 3:

Step 4:

So far, I'm happy with the result. I may tinker with the colours a bit more to even out the colour a bit more. Plus, the hearth and mantel look kind of ridiculous. So, I plan to plant them a dark brown colour so that they look more like wood and not something out of a bad 80s paint job.

I actually think it looks better from a distance:


We soon became experts in the downfalls of adhering your VCT to the cement floor with black tar, something installers used to do "back in the day." Namely, getting the stuff off would require some heavy toxins and scraping.


In addition to the 80s tile and VCT, there was also some sort of sticky tile on the perimeter of the room over top of the VCT (you can see it in the next picture). I can't quite figure out why it was put there. Any theories on that?
We also had laminate flooring throughout part of the basement. It was in good condition, but not at all part of the design plan (let's just pretend that I have a design plan).

Since the stairs already had carpet on them,


Carpet installation was a bit of a fiasco. We were told by the guy that came to do the measurements that we didn't have to remove the VCT/VAT. Turns out the people that do the measurements for things don't always provide accurate information. After about 10 minutes of installing the tack strip, we were told that they couldn't continue to do the work until we remove all of the VCT and sticky tile. That was frustrating because it basically meant that the time taken off from work, to be home while the installation took place, was for naught.

So far, I'm satisfied with the carpet. It's soft on the feet and the colour is pretty much what I expected.


It's pretty close the original carpet we had picked out, which was no longer available when we were finally ready to make the purchase. I prefer the non-patterned, slightly more natural (in my opinion) look of the sample, below. But, the carpet we went with is softer.

So, now I've got a pretty neutral canvas to work with. I don't want the room to be boring. So, I think it's going to be a bit of trial and error. Suggestions are more than welcome (as long as it doesn't involve changing what I've already done)!!!
Next up:
- paint the walls (including a feature wall or two)
- paint the baseboards and install new quarter-round
- switch out the light fixtures
- decorate (I'd love to put shelving around the fireplace -- not that I have any carpentry skill, mind you)
- figure out what to do for window coverings
We're not exactly the fastest with renovations. But, I'll post an update as soon as possible/available.


11 comments:
I am so impressed with your DIY fireplace!
So this is what happens when you watch all those renovation reality shows. It looks so great. Yeah, that green on the walls has to go. But most importantly, I'd like to see my room :)
Lovely post on the renovation i like the fireplace too
Looking good :) happy new year to you and family
After just redoing two bathrooms I know the joy of living through a remodel! Looks like you guys are coming along fine & "embracing" all the fun things of an older home.
Have you considered building a wooden box over the mantle and hearth instead of painting? Easy to do and will definitely look more natural than any paint job
MBAMama - I have considered it for the mantle! I would love to do that -- I just don't know how to make them. I've looked at a few online tutorials, but they were a bit intimidating. I don't think I would do it for the hearth though.
I LOVE that fireplace. You did an outstanding job on it. Really looks natural. We have a red brick one in ours. Matches our exterior of the house. I like it but have often thought of changing it. Good luck with the renos. We bought my folks home after my dad passed away and took 3 months to gut the upstairs. Redid all the landscaping front and back too. Plus new siding and painted the doors. Had a blast. Long three months. Worst part was scraping all the popcorn ceilings. Yuck! lol
You have done a fantastic job! The fireplace looks terrific. It's great you were able to do all this yourselves.
What an ambitious undertaking - and such incredible attention to detail! It looks gorgeous and what a lovely space it will be. A great way to start the new year!
:)
Valerie
You've been busy! Yikes. That's a lot of work. Congrats. The asymmetrical fireplace is tricky for sure, but why fight it? Embrace it! I like the idea of bookshelves. Lots of books bring life to a room... :)
Post a Comment